In this article, we will go through the steps involved in using the PTO Manager Excel template. To learn more about the features of the template, please visit the Product page.
This article is part of a series of support articles for PTO Manager Excel Template.
Overview of Steps
- Enter Weekends and Holidays in the Home sheet
- Enter policy inputs in the PTO Policy Settings sheet. Review first accrual window.
- Enter one employee’s data in Employees sheet. Review the PTO Report sheet.
- Enter list of all employees in Employees sheet
- When employee takes PTO, enter PTO info in Time Off sheet
- View PTO balance and balance trends in PTO Report sheet
- View PTO days on calendar view in Calendar sheet
- (Optional): To apply adjustments, enter in PTO adjustments sheet
DETAILED STEPS
Step 1: Enter Weekends and Company Holidays
To begin with, we will enter weekends in Home sheet.
 Settings – Select Weekends to exclude from working days
Here, I have selected Saturdays and Sundays as Weekend days. This will be used by the template to count every Saturday and Sunday as non-working day. If an employee takes paid time off (PTO) that includes a Saturday and Sunday, those 2 days will not be counted against the PTO balance.
Company holidays are given the same treatment. We can enter all our company holidays in the table.
 Settings – Enter Company Holidays to exclude from working days
Weekends and Holidays will be the same for all employees in your organization.
We are done with the Home sheet. Let’s move to the PTO Policy Settings sheet.
Step 2: Enter PTO Policy Settings
Though the template is simple to use, there is a lot of flexibility when it comes to designing the PTO policy.
There are some terms to understand and since different companies may have different interpretation for those terms, it is important to state clearly each one of them. I will explain all the possible options in each setting so that you can pick the one that applies to your company.
 PTO Policy General Settings – Sample Illustration – Weekly
START DATE
Let’s say you begin using this template on 1st Nov, 2016. You want to track PTO from 1st Nov in this template.
If you have employees who have already been working in your company and have accumulated a PTO balance, then you would need their balances as of 31st Oct, 2016. We will enter this balance data in a later step.
GENERAL SETTINGS
The general settings apply to the three types of PTO (template supports 3). The following inputs are provided.
PTO UNIT
We can choose to track employee PTO in units of Days or Hours. If we choose Hours, we must enter PTO taken by employee in Hours. If we choose Days, we can just enter PTO dates (which we will discuss later) and ignore hours taken off.
If you choose ‘Days’, please note that partial days (example: half day) are not allowed as PTO. When you choose Hours, you can enter any partial number of hours as PTO.
PTO ACCRUAL PERIOD
This is to inform how we accrue (at what frequency) the annual PTO rate. For example, a company may grant their PTO weekly. Every week, certain hours of PTO will be added to the PTO balance of the employee.
This template supports the following accrual frequencies: Weekly, Every 2 Weeks, Twice a Month, Monthly, Quarterly and Annual.

PTO Accrual Period – Weekly, Every 2 Weeks, Twice a Month, Monthly, Quarterly, Annual
We will see each of these in more detail. But before that, we need to introduce a couple of other terms.
FIRST ACCRUAL PERIOD BEGIN DAY
Continuing with the example scenario of weekly accrual, let’s say the accrual happens every Monday in your company.

November Month accrual days for a Weekly PTO Accrual Scenario
In the image above, I have shown 6 accrual days (Mondays) from Oct 31st to Dec 5th.
Since Nov 1st (when we started using the template) is a Tuesday, the active accrual period then is from Oct 31st to Nov 6th. So, our First Accrual Period Begin Date is Oct 31st, 2016.

We enter this First Accrual Period Begin Date in the settings.

PTO Manager Excel Template – Settings – First Accrual Period Begin Day
If the First Accrual Period Begin Date is after the Start date, then an error message appears.

Data validation Error when First period begin date after Start date
Please ensure that the First Accrual Period Begin Date is not after the Start Date.
ACCRUAL TIMING
Since we accrue at the beginning of the accrual period, we choose that setting as well. In some companies, accrual happens at the end of the period.
 Accrual Timing – Beginning or End of accrual period
Review First Accrual Period for accuracy
In the PTO Policy settings sheet, you will be able to instantly view the first accrual period calculated by the template.
It is very important that you review this and make sure that it meets your business’ expectations.
 First Accrual Period Window and Accrual Periods per year for review – Weekly (Beginning)
A check mark appears where the accrual happens. Here, in this example, accrual happens at the beginning of a period.
If the accrual timing is End of the period, then a check mark will appear next to 6th Nov (End) and 6th Nov will be the accrual day.
We can also see the number of accrual periods per year.
It is 52 for Weekly, 26 for Every 2 weeks, 24 for Twice a Month, 12 for Monthly, 4 for Quarterly and 1 for Annual.
The data entry in ‘General Settings’ is the same for Weekly, Every 2 Weeks, Quarterly and Annual accrual frequencies. So, let’s look at ‘Twice a month’.
Twice a Month Accrual Period
For ‘Twice a Month’, we don’t need to provide First Accrual Period Begin Date. We will enter 2 days instead.
 Twice A Month Accrual Period Setting
The template will then take those two days as the accrual days every month. In the example above, accrual will happen 1st and 15th of every Month.
 First Accrual Period Window and Accrual Periods per year for review – Twice A Month
First accrual period will be 1st Nov to 14th Nov. Number of accrual periods per year will be 24.
You can also choose ‘Last day’ for the second day and the template can automatically assign the last day of each month, whether it is 28th (Feb) or 29th (Feb – Leap year) or 30th or 31st.
 Twice A Month Accrual Period Setting Last Day option
The First accrual window will change accordingly.
 First Accrual Period Window and Accrual Periods per year for review – Twice A Month last day
Monthly Accrual Period
For Monthly, we don’t need to provide First Accrual Period Begin Date. Instead we will choose a day of Month. The options are 1 to 28 and Last day.

I have chosen the 1st of every month here.
The first accrual period will be Nov 1st to Nov 30th and the accrual will happen on 1st Nov.
 First Accrual Period Window and Accrual Periods per year for review – Monthly Beginning
This completes the steps in setting the accrual days and periods.
Now, we need to inform the template the amount of PTO accruals and other inputs.
Entering PTO details
The template supports 2 types of PTO to be tracked. For example, Vacation and Sick days are common in companies. Both can be tracked in this one file.
For the upcoming illustrations, let’s assume the following accrual period inputs in General Settings.

PTO unit is ‘Days’. Accrual happens on 1st of every Month.
We can choose how many types of PTO we need to track.
 Number of PTO Types to track
Let’ start with just selecting 1 type of PTO.
We can then enter more details about that PTO type.
 PTO Policy PTO Type 1 Settings – Sample Illustration – Monthly
We can give a name. I have entered ‘Vacation’. You can customize it as needed.
ANNUAL PTO ACCRUAL RATE
Annual Accrual Rate is the PTO that an employee accrues in one year. In our example, the company offers 12 days of PTO per year.

Monthly PTO Accrual – PTO Balance trend chart
12 days will be given to the employee annually at 1 day each month for 12 months.
ANNUAL PTO ROLLOVER POLICY
As an employee continues to accrue PTO every period, the balance keeps growing, assuming there are no vacations taken. Typically, companies do not want employees to accrue a very large balance.
Two reasons:
- Employees are encouraged to take regular time off to maintain a healthy work-life balance.
- Companies may consider remaining PTO balance as cash that needs to be paid to employee if employee leaves the company. So, a very high balance could mean more liability for the company.
So usually, there is a rollover policy. This determines how many hours of PTO can the employee carry over from one year to the next year.
The template allows three possibilities.
 Annual PTO Rollover Policy Setting – Options – Zero Rollover, Rollover Limit, Unlimited Rollover
Let’s see them one by one. I will explain the impact of each option and this should help you pick the one you prefer for your company.
Zero Rollover: Employee loses all the PTO balance at the end of the year and starts from scratch in the next year.
Choose Zero Rollover option in the drop down.
 Annual PTO Rollover Policy – Zero Rollover Limit
To understand the impact of this setting, see chart below.
 Annual PTO Rollover Policy – Zero Rollover Limit – On Balance Chart
At the end of 1 year of employment (Nov 2017), the employee’s PTO balance comes from 12 days to 1 day. The employee loses all 12 days of PTO due to Zero rollover policy.
Then, employee accrues 1 day for Nov 2017. So, the balance becomes 1 day.
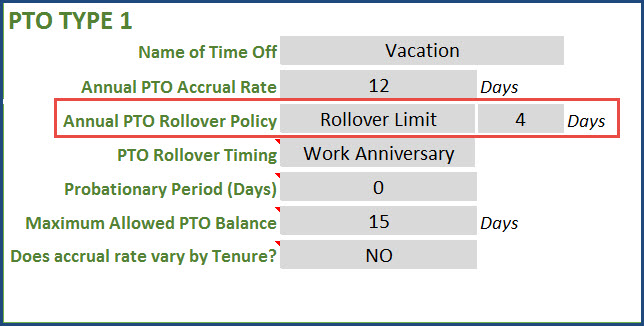
Rollover Limit: We can set a limit on how many hours are carried over.
I have chosen a 4 day roll over limit in this example.
 Annual PTO Rollover Policy – Rollover Limit of 4 days
The impact can be visually seen below.
 Annual PTO Rollover Policy – Rollover Limit of 4 days – On Balance Chart
At the end of 1 year of employment (Nov 2017), the employee’s PTO balance comes from 12 days to 5 days. It is 5 because 4 days are carried over and the employee accrues 1 day for Nov 2017.
Unlimited Rollover: Here the employee does not lose any PTO, and will carry over everything to next year. This is an unusual policy for a company.
 Annual PTO Rollover Policy – Unlimited Rollover Limit
At the end of 1 year of employment (Nov 2017), the employee’s PTO balance increases from 12 days to 13 days. The employee carries over all the 12 days and accrues 1 day for Nov 2017.
 Annual PTO Rollover Policy – Unlimited Rollover Limit – On Balance Chart
Hence, the balance becomes 13 days.
You might have noticed that I talked about this rollover happening after ‘completion of 1 year’. That is because we had chosen Work Anniversary as the PTO Rollover Timing. This setting is also customizable per your business policies.
PTO ROLLOVER TIMING
Companies may apply rollover at calendar year change (Jan 1st of every year) or on work anniversary dates (varying for each employee based on hire date). Some companies may also align this with their financial calendars. To support that, we have the ‘Custom Date’ option. Let’s learn more about this setting.
 PTO Rollover Timing Setting – Options – Calendar Year, Work Anniversary, Custom Date
Since we have already seen how Work Anniversary option works, let’s see how Calendar Year option impacts the balances. I am using Zero Rollover policy for this illustration.
 PTO Rollover timing – Zero Rollover and Calendar Year
The PTO balances are shown below.
 PTO Rollover timing – Zero Rollover and Calendar Year – On Balance chart
When it is Jan 1, 2017, the balance becomes 1 day. Balance from 2016 cannot be carried over and Jan 1, 2017 brings a new 1 day of PTO accrual. Then, the employee accrues 1 day each month and reaches 12 on Dec 1, 2017. Then, on Jan 1, 2018, balance is set to 1, exactly as it was done on Jan 1, 2017.
Custom Date
Let’s review the last option in PTO Rollover timing: Custom Date.
 PTO Rollover timing – Zero Rollover and Custom date
We have chosen Apr 1, 2017 as the rollover timing. This is to inform the template that Apr 1st of every year, PTO rollover policy should be implemented.
The PTO balances are shown below.
 PTO Rollover timing – Zero Rollover and Custom Date — On Balance chart
When it is Apr 1, 2017, the balance becomes 1 day. Balance from Mar 31, 2016 cannot be carried over and Apr 1, 2017 brings a new 1 day of PTO accrual. Then, the employee accrues 1 day each month and reaches 12 on Mar 1, 2018. Then, on Apr 1, 2018, balance is set to 1, exactly as it was done on Apr 1, 2017.
PROBATIONARY PERIOD & MAX PTO BALANCE
Let’s cover next 2 settings together.
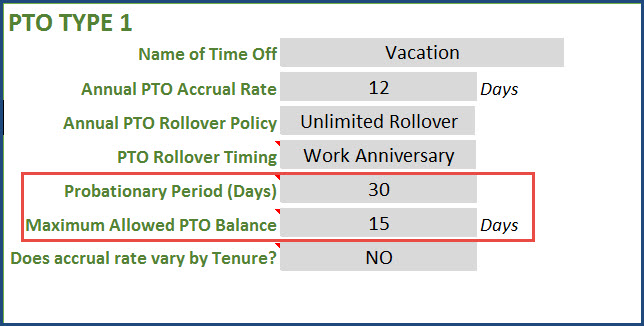
 Probationary Period and Max PTO Balance Settings in PTO Policy
PROBATIONARY PERIOD
In some roles, employees may not be awarded any PTO for the first X number of days. For example, employee may not earn any PTO during the first 30 days of employment. You can set that easily in this template as shown above in the Probationary Period.
MAXIMUM ALLOWED PTO BALANCE
The rollover limit (that we have discussed earlier) only applies to the balance as of specific timing (calendar year/work anniversary/custom date). Some companies can set a limit on maximum PTO balance an employee can carry at any time. We can set that amount in the Maximum Allowed PTO Balance.
We can see the impact of these settings on the balance chart as shown below.
 Probationary Period and Max PTO Setting in PTO Policy – On Balance chart
Now, we move to the final part of the PTO Policy settings.
ACCRUAL RATES VARY BY TENURE
Companies increase the annual accrual rate for employees who stay with the company for more years. This is a loyalty initiative which rewards loyal employees with better PTO benefits. We can handle such scenarios as well.
We would choose YES to this first.
 PTO Accrual rate varies by Tenure Setting
Once we choose ‘Yes’, the accrual rate and max PTO balance mentioned in the above image does not apply. Instead we must enter that information in the table below.
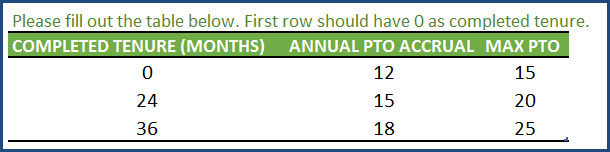
We can set the Annual PTO Accrual rate and Maximum PTO balance. In the example above, the employee will receive at the rate of 12 days annually in the first 24 months, then rate of 15 days annually in months 25 to 36 and rate of 18 days annually after 36 months of tenure.
Important: Please make sure that the first entry here is for 0 completed months.
You can enter more or less rows as needed. Read how to enter and delete tenure tiers
PRORATING WHEN ACCRUAL RATE CHANGES
If the work anniversary happens to be in the middle of an accrual window, then we have to pro-rate the PTO accrued.
Let’s take an example where an employee’s hire date is Jan 16th, 2016. Accrues 10 hrs a month in 1st year and then 20 hrs a month in 2nd year. So, for Jan 1, 2017, employee will earn 15.16 hrs. 15 days (from Jan 1st to Jan 15th) at the rate of 10 hrs per month and 16 days (Jan 16th to Jan 31st) at the rate of 20 hrs a month. The template does this prorating calculation by default.
Managing Two Types of PTO
This completes the policy settings for our Vacation PTO. If we need to manage two types of PTO for our company, then, we need to follow the following additional steps.
First, enter the number of Paid time off as 2.

Then, enter details of second PTO Type.
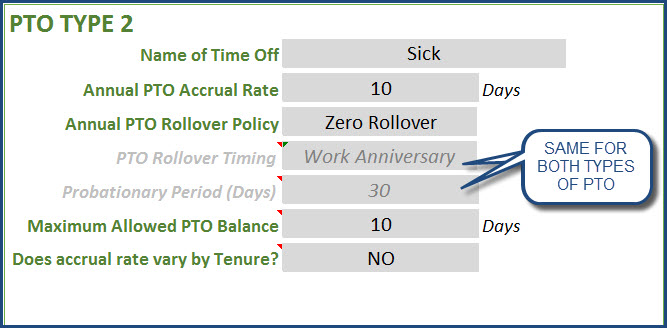
Just like we entered for PTO Type 1, give this a name. I have given here, ‘Sick’ as name.
The settings are the same as we discussed earlier. The only thing we need to be aware of is that Rollover timing and Probationary period are automatically set to match with PTO Type 1’s. Other settings can be different between PTO Type 1 and PTO Type 2.
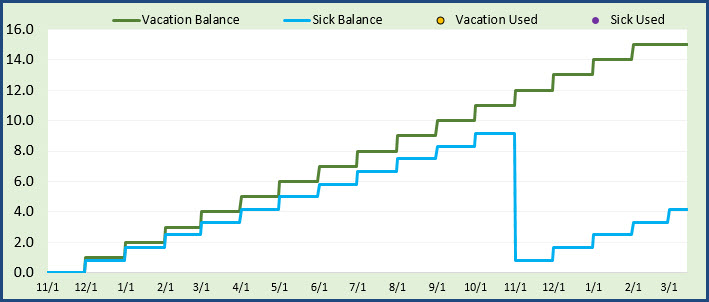
We are now set up to track two types of PTO. Green line represents Vacation days balance and Blue line the Sick days balance.
Managing Three Types of PTO
Similar to the previous step for two types, enter the types of Paid time Off as 3 and give the details of the 3rd PTO.

Here, we have given the third PTO as a personal paid off time.

The balance chart for this scenario looks as below:

Step 3: Enter a sample employee data and review PTO Report
Enter one employee’s data in Employees sheet so that we can review the calculations and ensure that it works as expected.
Let’s enter one employee name and hire date. In this case, hire date >= Start Date (Nov 1st). Hence I don’t need to provide any starting balances. Starting balance carried over is zero.

In the PTO Report sheet, choose Employee name from the drop down.

To refresh all the calculations, press Shift+F9. If the keyboard shortcut doesn’t work in your computer (sometimes keyboard shortcuts are taken over by other applications), then go to Formulas ribbon and press Calculate Sheet.

We can see the employee’s details as well as current accrual rate for the employee.
Further below in the report, we can see the accrual days.

1st of every month will be shown in light blue font indicating the accrual days.
This step should confirm that the accrual days are correct and meeting your business expectations. We should also check the amount of PTO accruing. For that we see the balance chart in page 2 of the report.

Green line represents Vacation days Balance and Blue line Sick days Balance, light green Personal time-off balance.
Please note that once the settings are entered once, they don’t have to be modified again. Once you start calculating balances using this template, please do not modify the settings later. Any change in settings will impact the Employee PTO balances.
Step 4: Enter All Employees’ data
I have entered 10 employees’ data for the demo here.
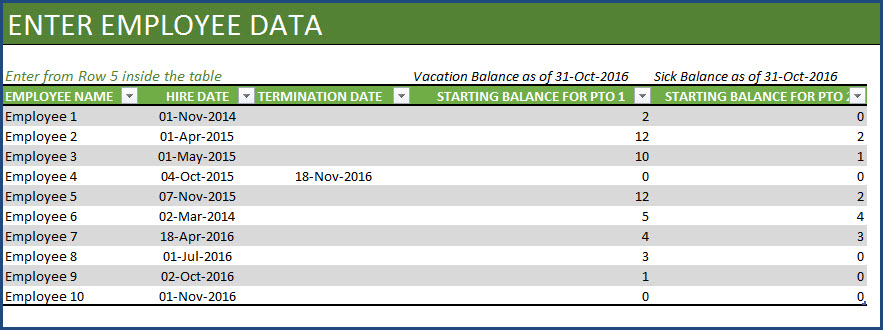
If an employee has left the company, please enter termination date.
For employees who had balances as of Start Date (when you began using the template), then enter starting balances.
If you were manually tracking PTO balances for employees, you can just take the final balance for each employee and enter in the table. This is a one-time step to migrate from your previous system to this template.
For example, employee 6 who was hired in Mar 2014, has a balance of 4 vacation days and 2 sick days.
Step 5: Enter Paid time off information
The next step is to enter Paid time off information when employees plan to take time off.
Enter PTO taken by employees in the Time Off sheet.
Employee Name, PTO Start Date, PTO End Date and Time Off Type are required fields.
If an employee takes only one day off, please enter the same date in PTO Start Date and PTO End Date columns.

If the PTO unit was chosen as Hours, then PTO Hours column should be entered. An example is shown below.

Daily PTO hours: Please enter PTO hours taken for each day even if you are taking multiple days together as PTO.
Step 6: View Employee PTO Report
We can view the employee’s PTO balance at any time by viewing the PTO Report sheet.
User input cells are filled in yellow color for easier identification.
We can choose an employee and see the report.
To refresh all the calculations, press Shift+F9. If the keyboard shortcut doesn’t work in your computer (sometimes keyboard shortcuts are taken over by other applications), then go to Formulas ribbon and press Calculate Sheet.

The report shows current balance as well as balance based on a given date.
The accrual days are shown in the calendar in light blue font. Vacation days are shown in black fill and Sick days in red fill, personal time off in blue fill.

We can also see the monthly totals of PTO earned and PTO used by the employee.

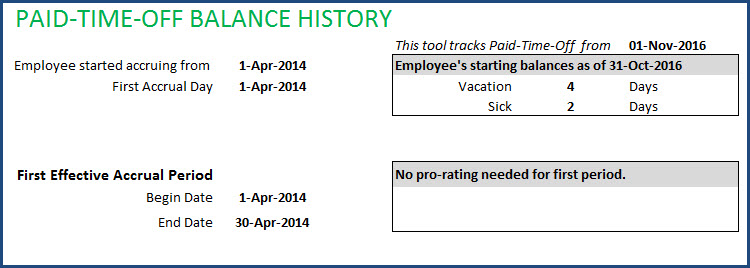
The second page of the report has the starting balances information.
If the employee started earning PTO during the middle of an accrual period, then prorating will be done and will be displayed.
PRORATING WHEN EMPLOYEE STARTS IN MIDDLE OF ACCRUAL PERIOD
We all know that employees can start in a new job on any day. Just to illustrate the prorating, let us take a slightly different example. An employee was hired on 15th Nov. Probationary Period set to 0 days.
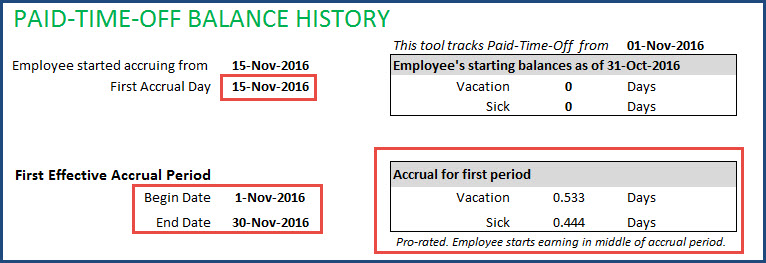
We can see that the first effective accrual window is still 1st Nov to 30th Nov, and the accrual happens on 15th Nov.
However, the amount is only 0.533 days of vacation because the employee only accrues for 16 days (15th Nov to 30th Nov) out of the 30 days in the month. So, 16/30 = 0.533. So, the employee accrues 0.533 days instead of 1 day. From the next month onwards, the employee will accrue 1 day per month of vacation. This prorating is only for the first period.
Thus the template can easily pro-rate the PTO awarded when an employee joins in the middle of an accrual window.
We can also see the trend chart which shows PTO balances and PTO used over time.

The duration of this chart timeline can be customized as needed.
The Balance Sheet shows the available PTO balances of all employees in the Balance sheet. View both types of PTOs: Current balance and balance as per your required date, as shown below:

Step 7: View calendar
The Calendar sheet is provided to help get a view of the entire team’s PTO for a month.

- We can change the Year and Month to view the calendar for that month.
- The three PTO types (Vacation, Sick days and Personal time-off) are shown in Black, Red and Blue fill colors. Holidays are shown in Purple and Weekends in W.
- If the employee is not employed on a specific day, then NE is displayed.
You can change the symbols used by just typing in the appropriate cells in the legend. For example, If I replace V with VC, then the calendar also will reflect that immediately.

The sheet also shows the totals for the month for each employee.

This information could be used for resource planning for a month, as you have a good view of number of days each employee is expecting to work in the month.
Read how to extend the calendar to show more than 40 employees.
(Optional) Step 8: Make Adjusments to PTO Balances
If you would like to add or remove PTO, outside the PTO policy settings you have entered, then you can use the Adjustment table.
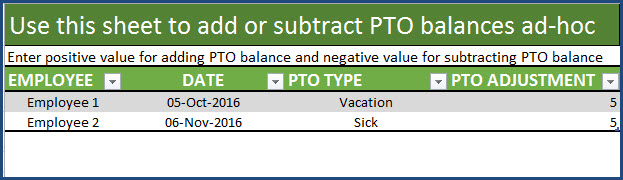
Enter Employee name, Date, PTO Type and the amount of Adjustment to be made. To increase balance, enter positive value. To reduce balance, enter negative value.