This article will demonstrate how we can leverage the custom columns available in the Task Manager (Advanced) Excel Template. Though I use this specific template in this article, the concepts apply to other templates on indzara.com, where custom columns are used.
To begin with, what are ‘Custom Columns’? I use this phrase to indicate columns that are available in the template that the user can customize and use for his/her specific need. The templates are designed with necessary columns needed for the functioning of the template. But the user would want to add additional information that is unique to their business requirements. These custom columns are designed to meet that need. Let’s take an example with our Task Manager template.
The table where you create your tasks has several columns and the first few are shown below.

There are more columns but there isn’t one called PROJECT NAME. However, in your business scenario, you would want to tag each task to its project. Similarly, different users have different needs for additional columns. If you are familiar with Excel and Excel Tables, you would easily add additional columns. However, I try to make my templates accessible for even those who are new to Excel. Hence, I provide ‘Custom Columns’ in tables where the user can just start typing their data.
In this article, we will see how to do the following:
- Enter Notes for task occurrences and make them appear on Dashboard and Report automatically
- Make task occurrence’s status appear on Dashboard automatically
- Enter Project Name at task level and make it appear on Dashboard and Report automatically
To become familiar with the structure and set up of the template, please visit the product support page for Task Manager (Advanced) Excel Template.
Adding Notes or Comments
The UPDATE_TASKS sheet where we update the status of task occurrences has two columns (CUSTOM COL 1 and CUSTOM COL 2) – as shown below.

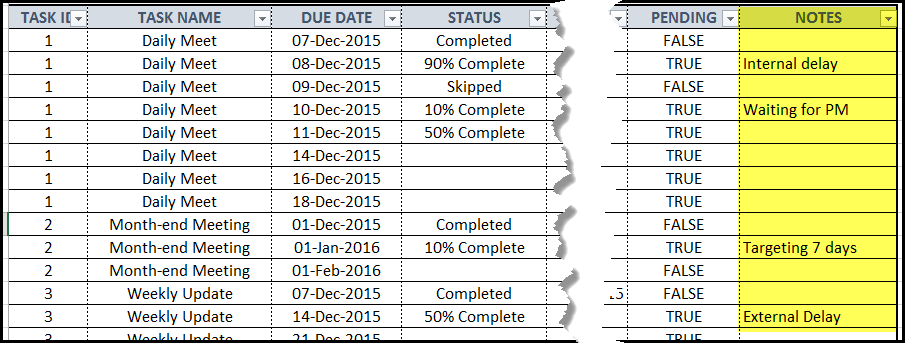
We can rename the column name CUSTOM COL 1 as NOTES (or anything you would like to name). Then, we can enter our notes in that column. I have shown below a sample.

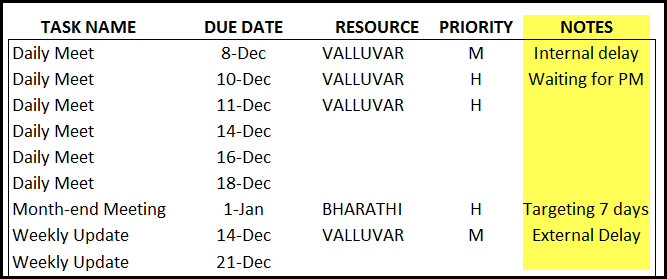
Now, when we see the DASHBOARD, the NOTES column will appear.

Similarly, on the REPORT sheet, the NOTES column will appear.

I have used Notes/Comments. You can use it to store any type of information at the task occurrence level.
2. Displaying STATUS on Dashboard
At the task occurrence level we can assign a status. If we want to display that on the Dashboard, we can do so easily with a simple formula.
First, let’s rename the CUSTOM COL 1 as TASK STATUS.
In cell I13 (first row in UPDATE_TASKS table), type ‘=’ and then use mouse to point to cell E13. Excel will now create a formula that looks like what is shown in the image below. Then, press Enter key. Now, Excel will apply this formula to all the cells in the column.

Now, the TASKS STATUS column will show the STATUS of the task occurrences.

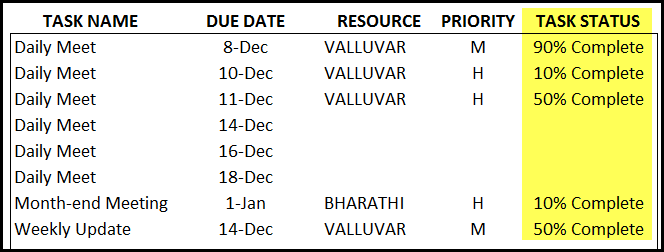
DASHBOARD now shows the TASK STATUS.

Similarly, you can point the formula to any column in the same table.
3. Adding Project Name to the Task and make it appear on Dashboard/Report automatically
This one is slightly more advanced than the previous items, since we will be writing a longer formula. ?
First, let’s use the custom columns available in the CREATE_TASKS table.
Please note the difference. Here, we use the CUSTOM COL 1 at the Task level. In the previous 2 examples, we used the CUSTOM COL 1 in the Task Occurrence level.

Then, we go to the UPDATE_TASKS sheet and enter a formula in cell I13 (CUSTOM COL 1 renamed as PROJECT NAME). This formula brings the Project Name from the CREATE_TASKS table to UPDATE_TASKS table for the corresponding Task ID.

Excel will apply the formula to all the cells in the column automatically.

Dashboard:

Report:

This is how easily we can extend the functionality of the template.
