In this post, we will see how we can do the initial setup for the template to customize it for our rental business.
Step 1: Enter Business information
Enter our Business Information in the Settings sheet. This information will be used to auto-populate in our Invoice.

Step 2: Enter List of Asset Categories
Please enter groups in which you would like to categorize your assets or products.

There are two key benefits of categorizing your rental assets or products. 1) We can analyze our business performance by identifying categories that bring more revenue versus those that do not. 2) We can make data entry in orders easier by first selecting Asset Category and the Asset drop-down list becomes a shorter list to pick from. We have entered 4 Asset categories for this demo.
Step 3: Enter the list of Assets or Products in the Assets sheet
Let’s enter assets and their related information. Please make sure that your first asset is in row 6.

- ASSET ID: Unique identification of Asset. This has to be unique. Please do not repeat the same ID or leave the field blank.
- ASSET NAME: Name of the asset. This needs to be unique.
- ASSET CATEGORY: Choose the Asset category to which each item belongs. The Asset Categories we had set in the Settings sheet will be used to populate this drop-down list.
- ASSET DESCRIPTION: Description of the rental asset, as needed in our business.
- STARTING QUANTITY: This is the quantity of the asset owned by the business when we begin using the template. This is entered only once and does not have to be updated daily. If you have rented items out, please include them here. This number needs to reflect all the assets currently owned (rented out or not). When we decide to retire an asset in the future or buy more assets, we can handle that separately. We will discuss that later.
- TAXABLE: In our business, if we have assets that are not taxable, we can enter NO. If tax is applicable, just leave it blank. By default, the tax will be applicable.
Step 4: Enter Customer information
In the Customers sheet, we will enter the list of our customers.
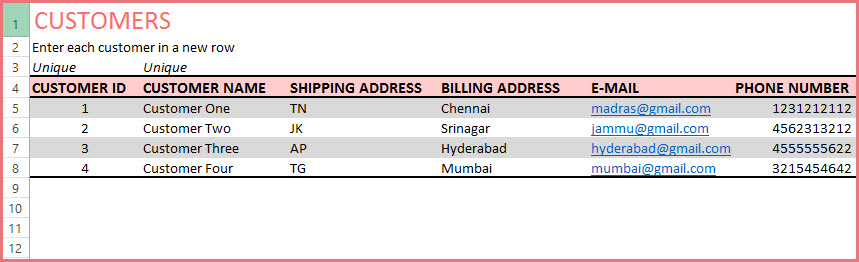
Please make sure that your first asset is in row 5.
- Customer ID and Customer Name should be unique here. Do not leave them blank.
- Enter Shipping and Billing Addresses. Enter Email and Phone Number. These details can be displayed on the invoice automatically.
- We can also add additional columns in this table. 2 Custom Columns are available that you can rename and use for your needs.
Step 5: Set up Invoice Sheet
An invoice sheet is a printable invoice that can be automatically created for any rental order. This sheet is very customizable to suit your needs.
First, let’s update the logo. Right-click on the existing logo and click on Change Picture.
Then, choose your logo image from your computer and click on Insert. Now, your logo will appear on the invoice when printing.
To change the size or other attributes of the logo image, press Ctrl+1 or click the Picture Tools — Format ribbon.
Then, let’s review the fields that are displayed on the invoice.
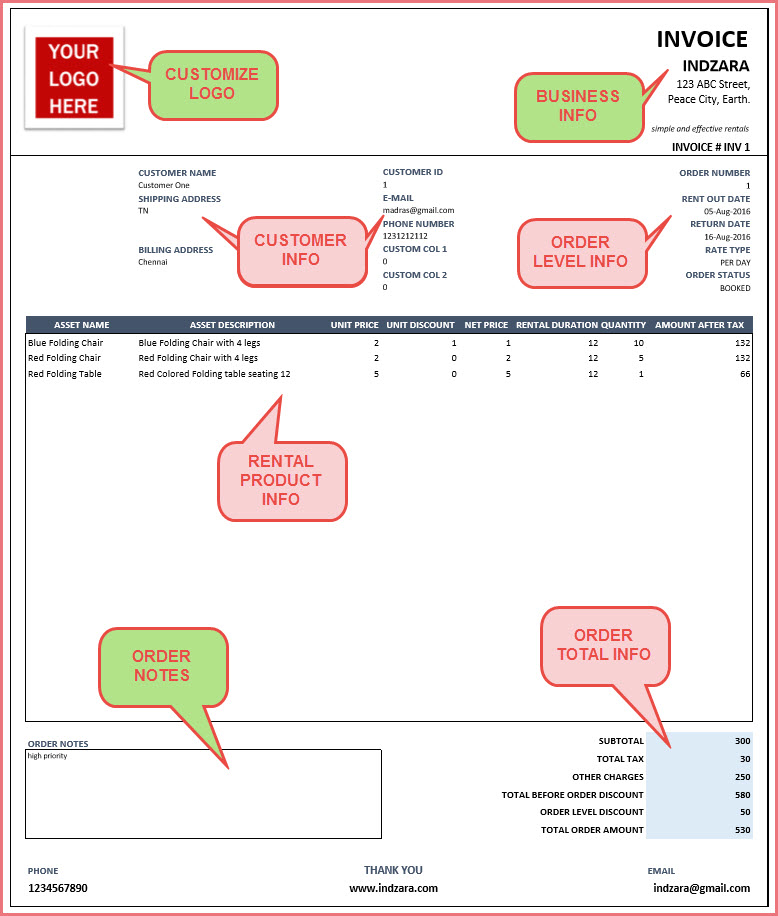
There are 4 key sections in the invoice: Customer Information, Order Information, Rental Asset Information, and Order Total Information. The invoice sheet is fully automated and for each order, all we have to do is to type the order number to create the invoice. However, before we begin creating invoices, it is recommended that we review the field displayed in the invoice and customize it to suit our business needs.
Customer Information (8 fields)

Order Information (5 fields)

Rental Asset Information (8 fields)

Order Total Information (6 fields)

Please review all the fields to make sure that the invoice meets your business needs. All these sections are customizable.
- If you do not need a certain field, just click on a field name and press the Delete key.
- If you need to choose another field instead, click on the field name. You will see a drop-down menu to choose from a list of available fields. Just select the one you need.
Once the fields are customized and everything looks good, let’s save the file by pressing Ctrl+S. Now, every time when we create our invoices, it will have the information we need. It’s just that simple.
Step 6: Set up Currency symbols
By default, the template does not display any currency symbols as this is meant to be a tool that can be used by any business in any country. However, it is set up to easily apply currency symbols as needed.
Let’s go to the Invoice sheet. Press Ctrl+G to open the Go To dialog box.

Find the name ‘CURR’ and click OK.
Excel will now select all the cells for fields UNIT PRICE, UNIT DISCOUNT, NET PRICE, AMOUNT AFTER TAX and the Order Total section fields.
This is assuming you have not modified the invoice fields. If you have changed or re-ordered the fields, then, please select the appropriate cells you need to apply currency symbols.
Press Ctrl+1 to open the Format Cells dialog box.

Select ‘Currency’ in the Category and then choose the symbol from the drop-down. Click OK. This will now apply the chosen currency to all the selected cells in the Invoice sheet.
For other sheets, if you would like to apply currency formats, please select the cells and then press Ctrl+1.
The calculations in the template are not impacted by currency symbols. This is purely for visual presentation.
With this, we have completed our initial setup.